The Windows 11 insider build is noticeably sloppy and unfinished.
The Windows 11 insider build is noticeably sloppy and unfinished.
Windows 11 appears to be a good
improvement, but not one to get excited about.
The week after its first major
announcement, Microsoft made early Windows 11 releases available via its
Windows Insider program, and we've spent quite a few hours spinning the tires.
When Windows 11 is released to the public, it will very certainly be a great
operating system—but right now, it's a sloppy, incomplete mess.
This isn't surprising, given that
Windows 11 is still only available in the Insider program's Dev channel.
Release Preview, Beta, and Dev are the three Insider channels; Dev is roughly
equivalent to a software alpha, and Microsoft characterizes it as "the
newest code," with "rough edges and occasional instability."
Windows 11 is only available as an upgrade (for now)

The first disappointment we had
with Windows 11 was that it couldn't (yet) be installed as a fresh operating
system. To install Windows 11 Build 22000.51, start with a completely patched
and up-to-date Windows 10 installation, then fly it into the Dev channel, and
then upgrade it to Windows 11 via Windows Update.
We had no issues updating a highly-used
Windows 10 VM as well as a brand-new one, but we strongly advise against
upgrading to Windows 11 on a system or VM that is important to you unless you
have a guaranteed method of recovery that you both trust and are willing to
employ. Although we rely on one of our test VMs as a "daily driver," It's
on top of a ZFS dataset, and we took a manual snapshot before upgrading to make
rollbacks easier.
Ironically, the feared BSOU (Blue
Screen Of Updates) is the first look anyone gets at Windows 11 right now—after
flying our Windows 10 VM into the Dev channel and one short download, it
rebooted. The typical "don't switch off your computer" message
appears during the reboot, but it's in a new typeface and maybe on a slightly
different shade of blue background.
The first download via Windows
Update is speedy, but the "working on updates" step takes a long
time. On each of the Windows 10 VMs we upgraded—one that had been around for a
while and one that was brand new—this process took around an hour.
Alpha denotes the letter A.

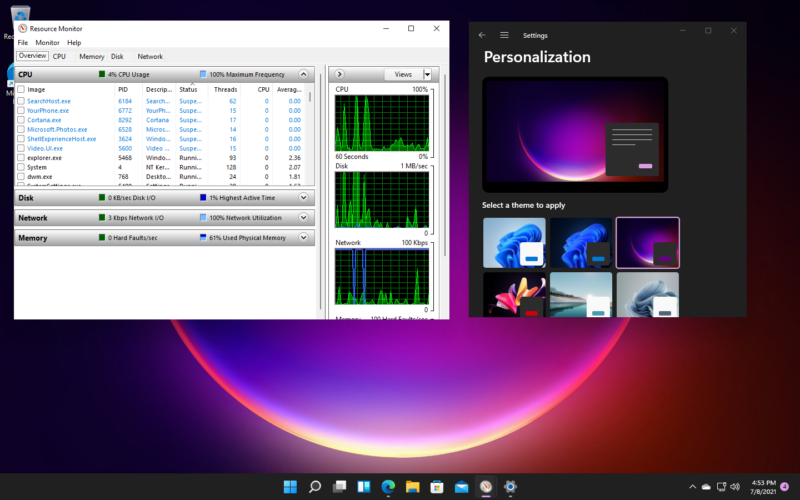
The DNS resolver was strangely
and inconsistently broken, and the network configuration dialog under Settings
was also broken. It took us almost no time to find our first and second nasty
Windows 11 bugs—the DNS resolver was strangely and inconsistently broken, and
the network configuration dialog under Settings was also broken.
The DNS resolver difficulties are
seen in the first screenshot. We can ping 8.8.8.8—Google's anycast DNS
provider—successfully, so we know that overall connection is good both inside
and outside the LAN. However, attempts to ping google.com are unsuccessful!
When we use nslookup to directly query our DNS server, the uncertainty grows
even more—it answers our queries perfectly.
Attempting to ping the same
hostname directly, as well as most browser tries using Edge or Chrome, fails.
The second bug appeared while
trying to troubleshoot the first—trying to set IP address configuration
directly using Windows 11's Settings dialog fails miserably, with a cryptic
message to "check one or more settings and try again." There's
nothing wrong with the settings; the dialog is simply broken. Is Control Panel
still available?
Thankfully, Control Panel hasn't
been completely removed from Windows 11, and its tried-and-true network adapter
configuration dialog still works as expected. Unfortunately, this did not
resolve the original DNS problem, which was caused by a conflict between
Windows 11 and the VirtIO network driver we were using.
Changing the VM's network adapter
to an emulated Intel e1000 resolved the DNS problem, as did, amusingly, leaving
the NIC as VirtIO and simply using a DNS server on the other side of a
WireGuard tunnel. (Because WireGuard has its own virtual NIC, we're not
technically using our "real" network card to connect to the DNS
server on the other side of the tunnel.)
We've been playing with Windows
11 for about a week now, and the entire VM has locked up several times,
necessitating a hard reset. Did we mention that this is still beta software,
and no one should be running anything important on it just yet?
Snap layouts and snap groups are two types of snaps.
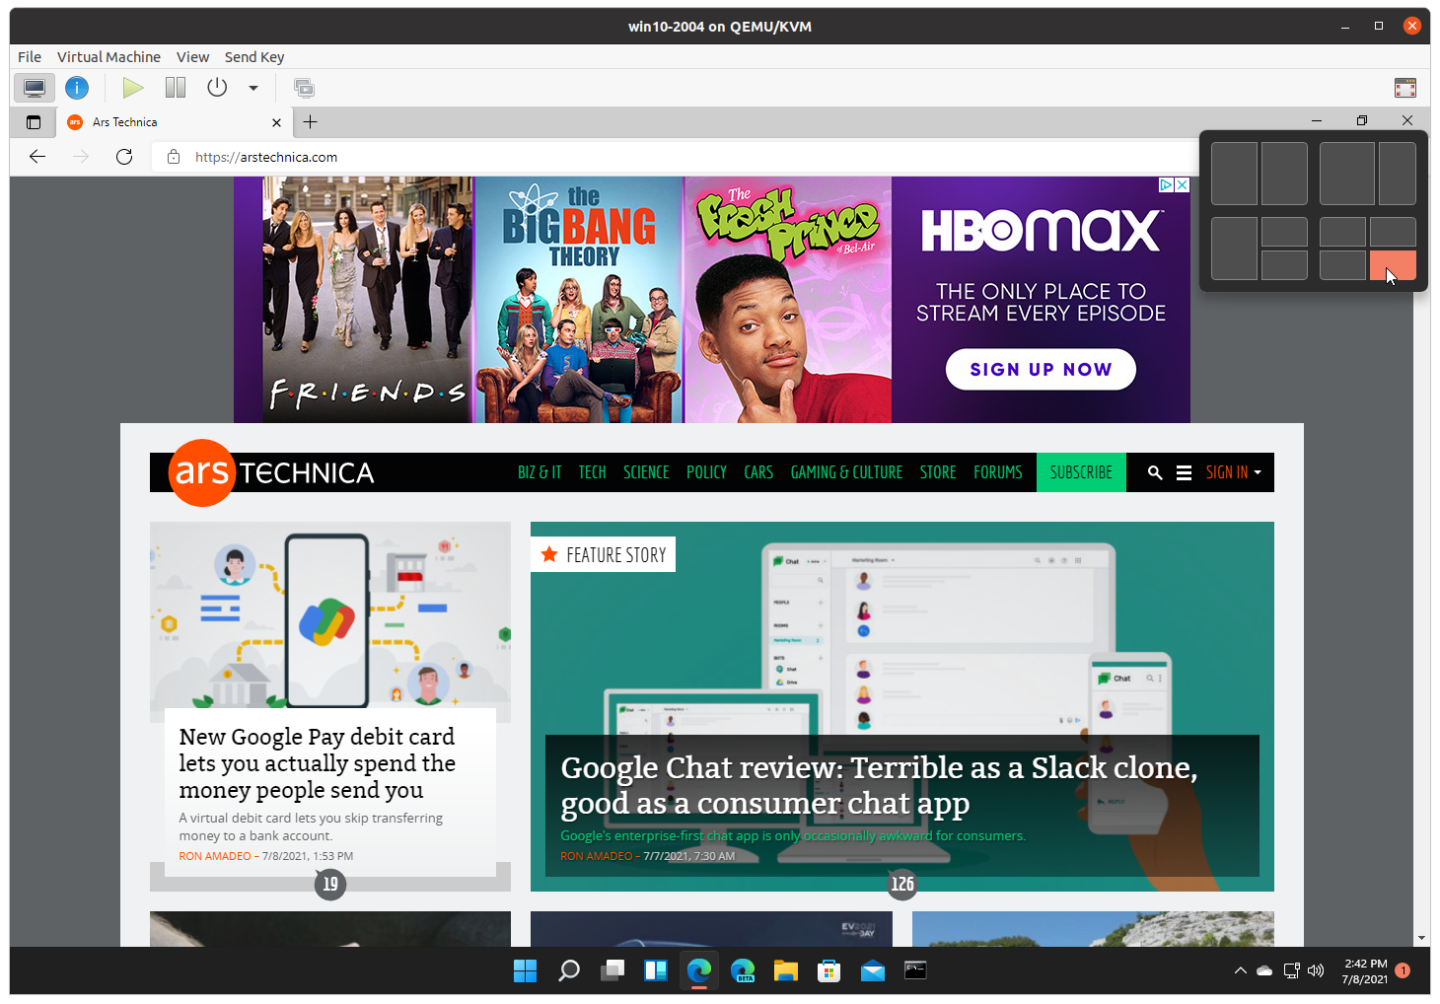
Snap layouts and snap groups are
two features in Windows 11 that we are particularly excited about—finally, a
tiling window manager for the rest of us! Unfortunately, they are not yet as
useful or intuitive as they should be. To add an app to a snap layout, hover
over the app's maximize button until the snap layout selection appears. When
you click a specific box within one of the four snap layouts available, the
application will resize, reshape, and move to fit.
Snap grouping becomes available
after you've added several apps to a single snap layout—but it's not easy to
find, and the current clumsiness of its use significantly reduces the value of
this promising feature. To access snap groups, hover your mouse over the
taskbar button for any of the snapped groups. After a few moments, this
generates the familiar Aero-style application preview bubble over the app's
taskbar icon—but in this case, it also generates a second Aero bubble for the
entire group.
From here, you can interact with
the snap group by right-clicking the group's Aero bubble, which allows you to
restore, minimize, or close the group as a whole. It also provides "Group
settings," which are not settings for that specific snap group, but rather
a link to the Multitasking section of Windows 11's Settings dialog.
Task view, aka virtual desktops
Virtual desktops are given an
update in Windows 11, bringing them front and center in an attempt to pique the
interest of more Windows users. If you're unfamiliar with the concept, it
entails creating additional desktop workspaces that can be accessed via the
Task view button on the taskbar.
Apps open on one virtual desktop
do not appear on other virtual desktops—the apps can still communicate with one
another if necessary; this is not a separate user session. However, they are
visually separated into different spaces. This allows you to have one
"work" desktop with your work email, a selection of work-related
websites, and professional applications, for example. as well as a second
"play" desktop with shortcuts to all of your favorite games, your
personal email open, and so on.
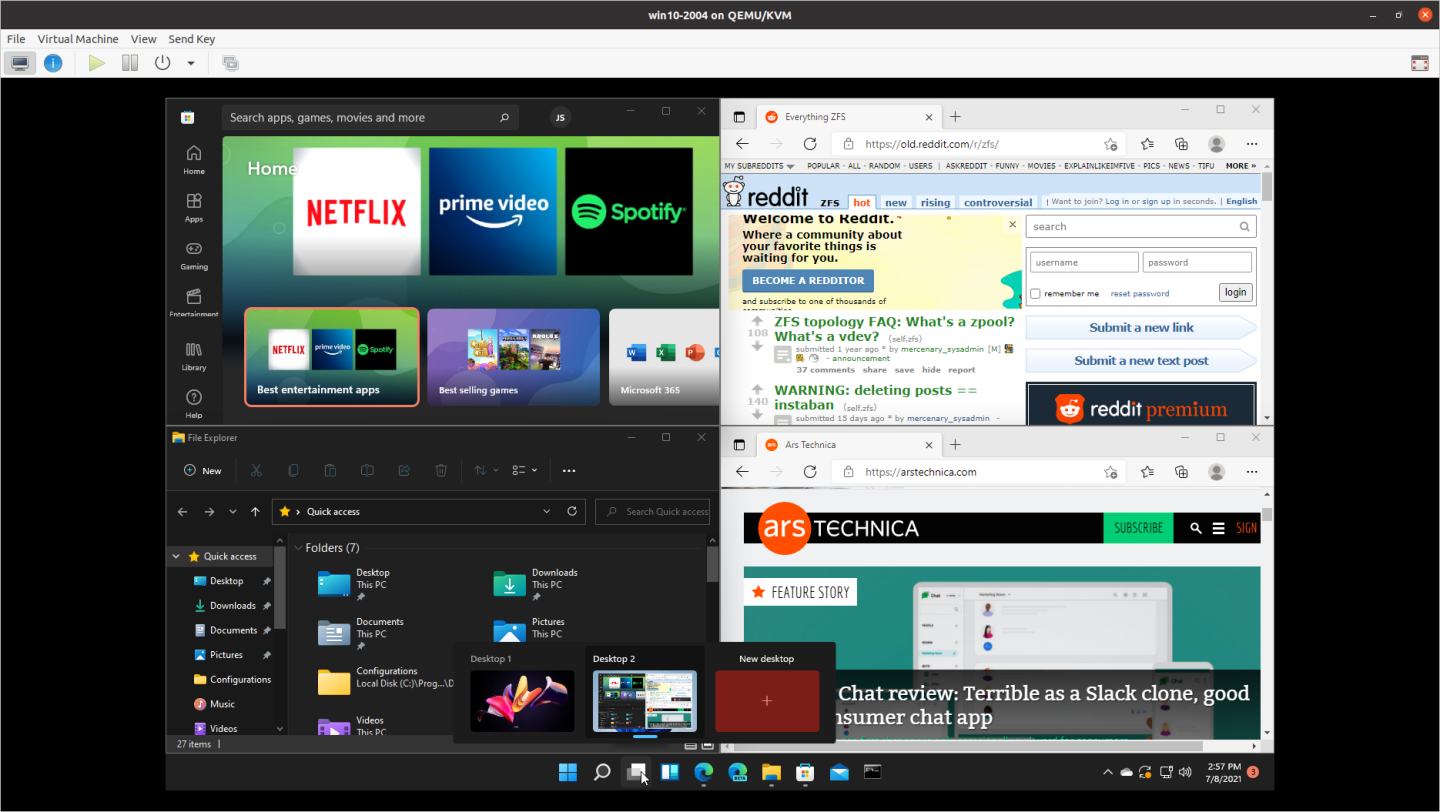
After you've created and
populated your virtual desktops, the Task view button will assist you in
managing and switching between them. Hovering over Task view displays the open
virtual desktops; clicking it displays a list of running applications on the
current desktop as well as a list (and previews) of the virtual desktops
themselves. You can also rename individual desktops in Task view by
right-clicking them, so your virtual desktops can truly be "work" and
"play" rather than the default "Desktop 1" and
"Desktop 2."
Unlike previous versions of
Windows virtual desktops, you can set wallpaper for each virtual desktop
individually in Windows 11. Unfortunately, this does not apply to the entire
theme—if we change one virtual desktop from Windows (light) to Glow, the Glow
theme is applied to all virtual desktops. However, we were able to set one
desktop to Windows (light) and another to Windows (normal) (dark). As a result,
this could still improve before Windows 11 is released.


Comments
Post a Comment